Pages

Showing posts with label Mini. Show all posts

Wednesday, August 16, 2017

Simply Mini Swap

So, a couple of weeks ago I shared my Mermaid Mini....well that was actually the second mini that I made with a mermaid.  The first was made for the Simply Mini Swap back in October 2015.  Based on my partner's preferences I created an ocean themed mini.  I created the ocean and coastline with the same curved cutting technique.

 
Then I sketched out the details that I wanted to include.  The scale of the details are much small to create the ocean scene.  I backed all the piece with fusible webbing and ironed them in place after I got them arranged in a way that I liked. 

I happened to have a Day Sail charm pack by Bonnie and Camille out on my sewing table when I was creating this mini and the little sail boats were perfect for this mini.  I used several of the other prints to help with the details of the lighthouse and mermaid's tail.


Wednesday, August 2, 2017

Mermaid Mini


As promised...my next catch up post.  This one is about the most recent mini quilt I completed.

The was a Sea mini swap...so ocean creatures and colors.  After seeing my partner's inspiration pictures and reading all her answers on the sign up form.  I knew it had to be a mermaid.  I try very hard to make sure that what I make for my partners is thoughtful and heartfelt.  I want them to feel special when they open their packages. Sometimes that means make a pattern that already exists and sometime that mean something original.

So I started with a fabric pull...blues to represent the sea...

 
A few years ago, while we still lived in Alaska, I checked out a book by Jean Wells called Intuitive Color and Design.  She uses a technique where you overlap two strips of fabric, free hand cut a gentle curved line and then sew the strips together.  I used this method to create the background for my mermaid.
After completing the background I got busy sketching up my mermaid, scanned her into the computer and printed out several different sizes.  I ultimately went with the one in the upper left because I felt like she was the most proportional to the water.
 
In the picture below you can see a collection of scraps that I used to create my mermaid.  Her hair, face and arm are fused on to the background with Pellon Lite EZ-Steam II. With this particular fusible you can remove one side and stick the fabric on before you fuse it.  The hair was a bit labor intensive as I cut every little piece and attached it to the fusible web after I had drawn all the shapes on the back.  That allowed me to attach it as one large piece to the water without having to line up all the tiny strips and even though the fusible created a permanent bond I did stitch around every single bit of her hair to create more movement.  I starched the fabric for the tail and tacked it on with a fabric glue stick before sewing it down.  
For the quilting I just did wavely lines that mimicked the curves in the background and outlined the mermaid so that she would stand out a bit..  I also did a it of embroidery to add details to her face.


I love the way she turned out and while it was hard to send her off to her new home, I know she is loved.

Tuesday, July 15, 2014

Rain Drops Mini

The second round of the Schnitzle & Boo Mini Quilt Swap is wrapping up.  There were over 600 people participating this round...amazing!  That means 1200 mini quilts are flying around the world, landing in mailboxes and making lots of people smile!  This is a secret swap, so the recipient of the mini I made didn't know I was making it for her until it arrived in her mailbox.   

Alright partner what do you think? I picked all your favorite colors but was thinking about a pop of something else... #schnitzelandboominiquiltswap #makeaquiltmakeafriend 
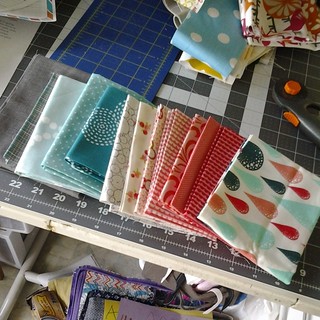
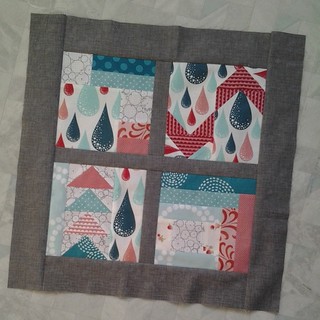
This is the fabric I pulled from my stash for my partner.  The raindrop print was perfect for tying everything together.  I picked four blocks from Tula Pink's City Sampler book, that really worked well to show off the fabrics.
Alright partner...I got the top done, just need to decided on backing and goodies! #schnitzelandboominiquiltswap #makeaquiltmakeafriend


Here's the front and the back...as you can tell the rain drop print was really the focal point.  I made sure when I was cutting that I would always have them going the same direction.


I was just a bit short on the turquoise print I used for the binding but I'm really happy with the way that bit of pink finished it off.
A close up of the quilting... 

I don't FMQ well, so I chose to quilt around  some of the shaped created by the piecing and a few of the rain drops in the Tula print.
I included a couple of extra goodies...including a pouch for sunglasses, a roll of washi tape and a great pad of post it graph paper.


Linking up with Show and Tell hosted by Randi at I have to say.

Sunday, October 27, 2013

Owl and Geese Mini Quilt

Owl and Geese Mini 

Through Instagram I heard that Kristi from Schnitzel and Boo was organizing a mini quilt swap. I'd done a couple of swaps in the past and I loved it, so I signed up! I think there ended up being something like 180 swappers.  This one was set up so that you only know who you are sending to.  Each of us filled out a questionnaire so that Kristi could pass it on to whomever had our name.  When I read the info my partner provided I knew almost instantly what I wanted to do. This is the initial fabric stack I pulled from my stash. I ended up digging through my scrap bin to add a bit more variety.

What do you think partner? #schnitzelandboominiquiltswap

The owl and geese are paper pieced. (Please excuse the horrible pictures, I didn't think to get out the good camera when I was sewing.)

 Does it look like an owl?  It still needs eyes.

 Hopefully I'm on to something for my #schnitzelandboominiquiltswap.

After getting those parts done I did struggle a bit with what do in the corners but ultimately settled on more dark brown to help pull it all together.

 Coming together...I need to make something for the corners.  #schnitzelandboominiquiltswap  #makeaquiltmakeafriend

I can't wait to get this in the mail to my partner on Monday.  I really hope she likes it!

 Owl and Geese Mini 

Stats ~
Size ~ approximately 14" square
Fabric ~ all from my stash
Designed, pieced and quilted by me!

If your interested please take a look at the other quilt I entered in the Blogger's Quilt Festival. 

 AmysCreativeSide

Wednesday, September 5, 2012

That time of year

We are settling back in to the school routine at my house.  My oldest started 1st grade about a week and a half ago. This is the picture I took of him one the first day...

(He had a hard time containing his excitement!)
He's pretty happy being back in school with his friends and he has the same teacher as last year which makes it the transition that much easier.

My little one and I settling back in to our routine.  I think we are beginning to transition out of regular naps but she is pretty good at entertaining herself for short periods of time so I can work on sewing project or chores.  

(She decide the was the appropriate outfit for a day out fishing.)
 I don't remember exactly when I started stitching these hexies but it was a while ago. Over the summer they were my take along project for swimming lessons.  I tried several different layouts before deciding which arrangement I liked best.

Trying to decide if I like my Terrain hexies orderly or ameba-ish.

Originally I was thinking that they would become a pillow but when I was trying to come up with the background fabric I decide they would look better as a mini quilt.  I just lined up the side of my foot against the previous row of stitching and echo quilted around the shape that the hexies made on the background.  It was a bit tedious with all of the angles but I'm in love with the 3D effect that it gives the quilt.


I also love the way the colorful hexies float in the white background. The hexies, backing and binding are made from Terrain by Kate Spain and the white background is something I had on hand.  It is a tone on tone print that has tiny white flowers on it.


This mini finished at 17" by 20". I used one of my personalized Sweetwater Label Crew labels on that back.


Sunday, June 3, 2012

What a Surprise!

I don't know what to say! You are all too sweet with your comments.  Kris, thank you so much for sending everyone over here to take peek.  In just a few hours the number of followers almost tripled.
 
Just a few pictures I took as I was making the quilt.  The star is paper pieced and the hst's are just over 1 inch.  You can find the pattern for this star here.  I've had that pattern "pinned" for a long time and when I realized that Kris did too, I knew it was the perfect time to try it.  It's just over 12.5 inches when its done so I knew I had to add something else to get it bigger, so I add the Kona Ash for boarders and the hst's.  The rest of the fabric is from Amy Ellis' Blogger's Choice Bundle from the Fat Quarter Shop that I won earlier this year.

And here are a few pictures I took of Kris's quilt before I mailed it off.